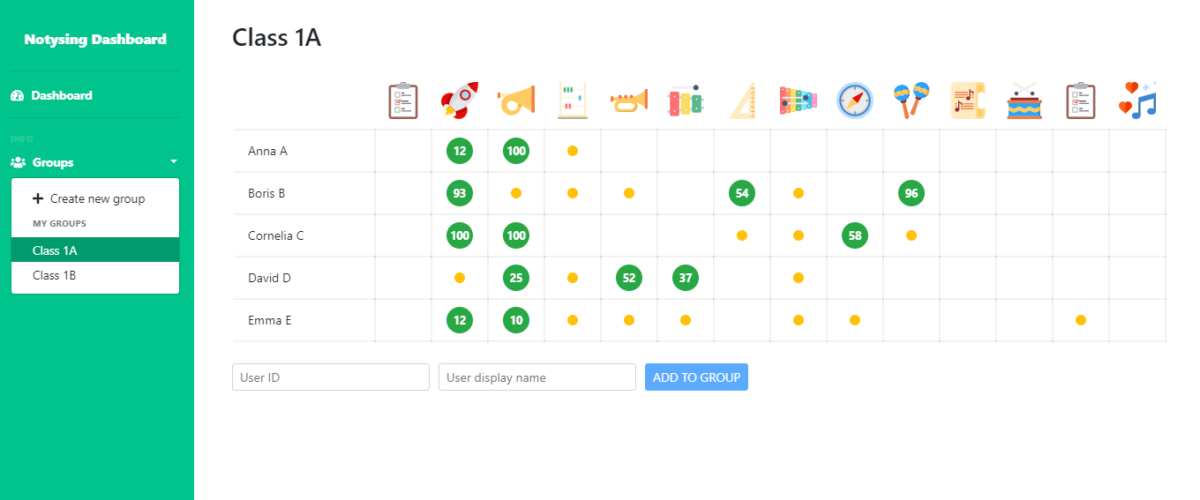
The Notysing Dashboard
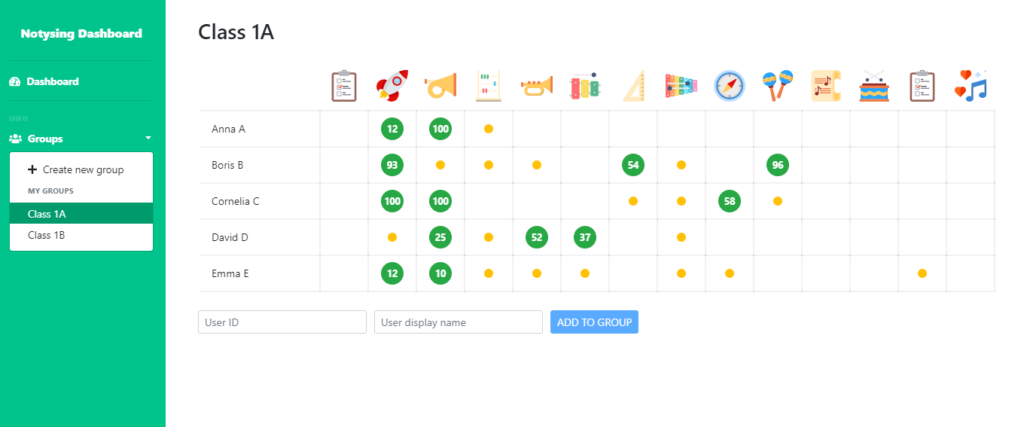
In the Notysing Dashboard, you can manage your students, add them to groups and track their lesson progress.
Not only can you see what lessons have been completed by the student, you can also see the percentage score of each lesson. This is great for following up on homework, assigning extra practice in the different topics and can help with assessment.
The lesson score takes into account both the number of retries needed to complete each exercise, as well as the accuracy of the pitch/timing of each note sung.
Students can be added to the dashboard via email, Google Classrooms import or as anonymous users to simplify GDPR/privacy compliance. Read more below.
Set up your account
Create an account or login
If you are new to Notysing, launch the dashboard and create an account.
If you have used the app and created a profile in the app, use the same method to log in to the dashboard, your email or Google Login.
Create a group
Create a group with the + button in the sidebar. A group can include all your students, just one class or a smaller group.
Create Anonymous Student Accounts
Anonymous Student Accounts helps your school with privacy compliance, such as GDPR. Accounts can be set up for your students without any identifiable information about the students, removing any concern of collection and processing personal data.
(The app doesn’t send any audio recordings to our servers, and no other personal data is saved using the app.)
- Click the “Create Anonymous Student Accounts” button on the home page of the Dashboard
- Set up a teacher code. This is a random code that your students will use to identify you. You can re-randomize to get a code that works for you.
- Select or create a new Dashboard group to import the students into
- Paste the list of student IDs, one on each line, from a text document or Excel (the list can contain a password separated by comma, tab or semicolon):
student001, password123
student002, BetterPassw0rd
student003, qwerty123
The accounts are now created and your students can log in to the Notysing, in the browser or in the app, by clicking “Have account” -> “Log in with a code” and entering the teacher code, the student ID and the password.
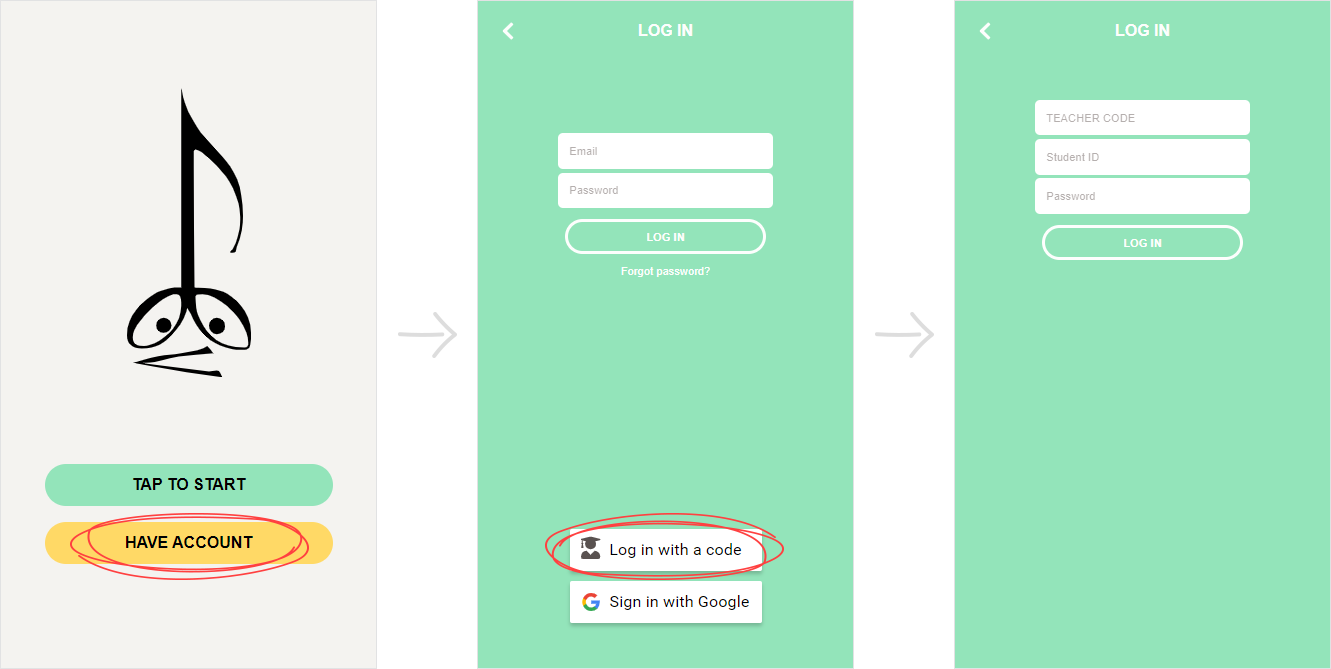
Note: Make sure to not enter any identifiable data as student IDs or passwords. Identifiable data includes first name, last name and date of birth. Consider using initials, School Student ID Numbers or simply a serial number. Check with your Data Protection Officer what works for you.
Import students from Google Classroom
If you are using Google Classroom to manage your classes, you can automatically import your students into dashboard groups.
- Click the “Import Users” button on the home page of the Dashboard
- Choose “Google Classroom” and click next to authorize the import
- Select the Classroom you want to import users from
- Select or create a new Dashboard group to import the students into
- Choose what students from the Classroom you want to import and click “Import”
The students are now added to the group.
The students need to login to the Notysing App with the Google Login button using the same Google account connected to the Google Classroom, and their progress will show up in the progress table. This does not work if they use their google email in the email login.
Reload the page to see updated progress.
Import students by Email
With a list of email addresses, you can add many students at once into dashboard groups.
Ask your students to:
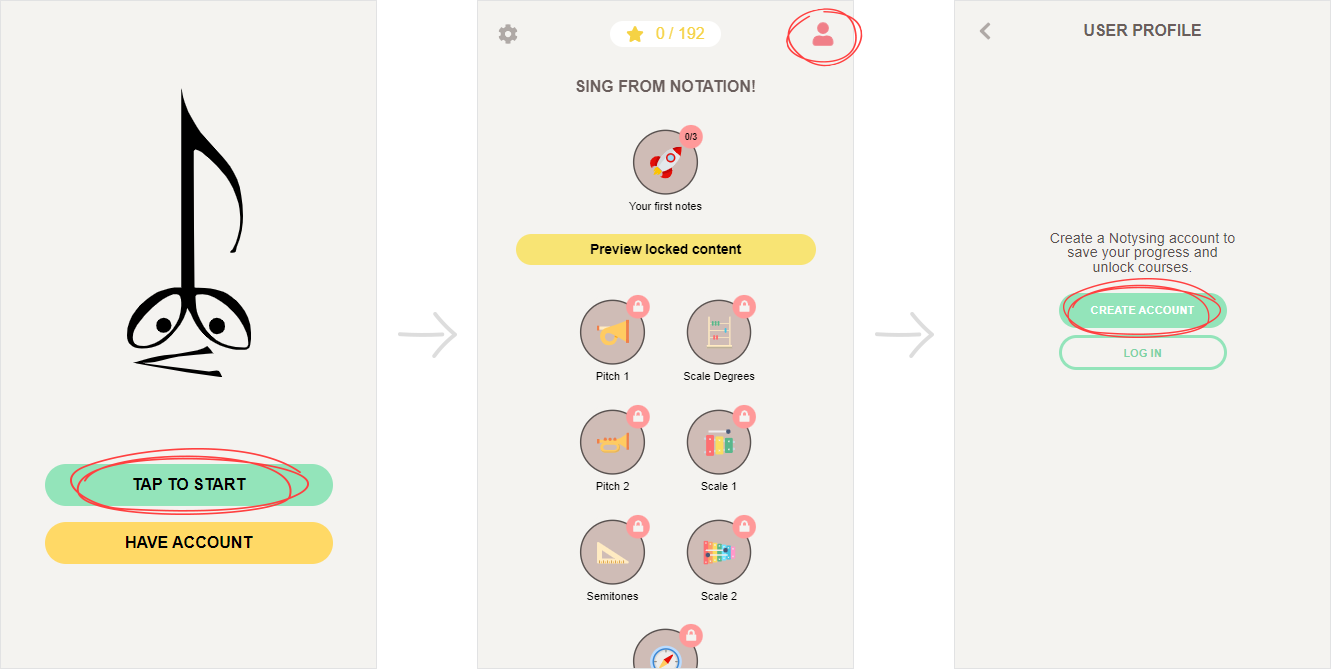
- Open the app
- Click the user icon on the main page and create an account using email.
In the Dashboard:
- Click the “Import Users” button on the home page of the Dashboard
- Choose “Email”
- Select or create a new Dashboard group to import the students into
- Paste the list of email addresses, one on each line, from a text document or Excel (the list can contain a display name separated by comma, tab or semicolon):
anna.a@school.com, Anna A
boris.b@school.com, Boris B
cornelia.c@school.com, Cornelia C
Students that have accounts created using that email will now be added to a dashboard group.
If some of the users were not added, perhaps if they had not yet created accounts, you can import the entire email list again into the same group once they have created accounts.

Once they started completing lessons, reload the results page to see updated progress.
Manually add students by Email
You can manually add students to groups using student’s email adress.
Ask your students to:
- Open the app
- Click the user icon on the main page and create an account using email.

In the Dashboard:
- Type the email adress in the “Email or User ID” field in the group
- Type a display name for the student
- Click “Add to group”
The user is now added to the group and the progress shows up in the progress table. Note that the student need to create the account before you add them, or you will get an error.

Once they started completing lessons, reload the results page to see updated progress.
Manually add students by User ID
You can manually add students to groups using student’s User ID. The User ID is found in the app.
Ask your students to:
- Open the app
- Log in or create an account using any method.
- Click on the user icon on the main page to go to the Profile page
- Click “Copy User ID”
- Paste the ID in a message to you
Use your normal channels to get the message, such as email, SMS, Messenger, or whatever makes sense for your school situation.
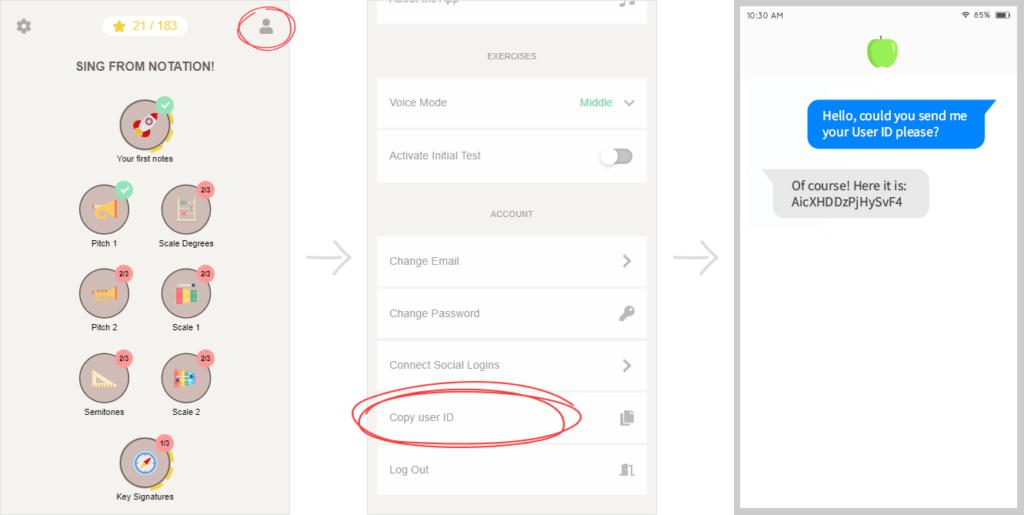
In the Dashboard:
- Paste the User ID in the “Email or User ID” field in the group
- Type a display name for the student
- Click “Add to group”
The user is now added to the group and the progress shows up in the progress table.
Reload the page to see updated progress.

